
Contents
- 1 Pre-Dismantling Safety Checks and Preparation
- 2 Step-by-Step Scaffolding Dismantling Sequence
- 3 Safe Component Handling and Post-Dismantling Procedures
- 4 Frequently Asked Questions
- 4.1 What’s the most important rule when dismantling scaffolding?
- 4.2 How many workers are needed for safe scaffold dismantling?
- 4.3 Can you dismantle scaffolding in windy conditions?
- 4.4 What should you do if you find damaged components during dismantling?
- 4.5 How do you maintain scaffold stability during progressive dismantling?
- 5 Conclusion
Dismantling scaffolding isn’t just erection in reverse, it’s a methodical process that requires careful planning, proper sequencing, and strict adherence to safety protocols. A proper dismantling approach protects workers, prevents structural collapse, and ensures compliance with HSE regulations. Many scaffolding accidents happen during takedown, not installation, because workers rush through the process or skip critical safety steps. This can have serious consequences.
The stakes are high. A 65% reduction in fall risks occurs when dismantling from top to bottom in reverse erection order (GM Scaffolding Blog, 2024). This guide walks you through the proper scaffolding dismantling sequence, from pre-inspection to final component removal, with specific attention to KSA safety requirements and international best practices.
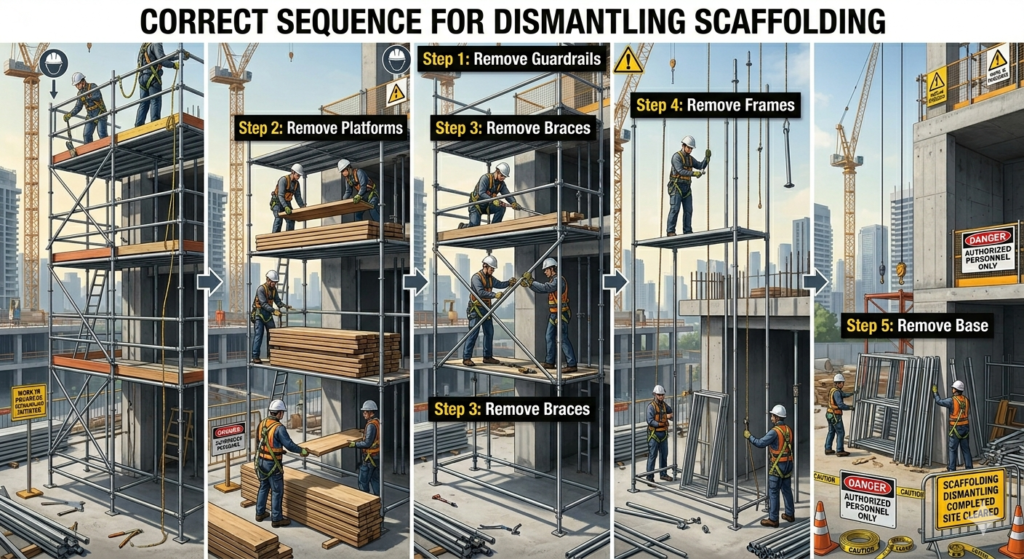
TL;DR: Dismantle scaffolding in reverse erection order, starting from the top level. Remove sheeting and mesh first, then planks and guardrails, followed by horizontal bracing, and finally vertical standards. A 65% reduction in fall risks occurs when following the proper top-to-bottom dismantling sequence (GM Scaffolding Blog, 2024).
Pre-Dismantling Safety Checks and Preparation
Before touching a single component, 75% of dismantling incidents involve failure to inspect tools like wrenches and hydraulic equipment beforehand (AJD Scaffolding Guide, 2024). This statistic alone justifies a thorough pre-dismantling inspection. Your preparation phase determines whether the takedown proceeds safely or turns into a hazard zone.
Start with a comprehensive scaffold inspection. Check for damaged components, loose connections, and structural integrity issues. Look for signs of overloading, corrosion, or weather damage that could affect stability during dismantling. Document any concerns and replace damaged parts before beginning removal.
Next, verify the scaffold’s stability requirements. Scaffolds require guyed, tied-off, or braced support if the height to base ratio exceeds 3:1 before dismantling release (SLAC Stanford Scaffold Procedure, 2024). This means a 12-meter tall scaffold needs at least a 4-meter base width, or it must have additional support systems in place.
Prepare your tools and equipment:
- Inspection checklist: Complete all items before starting
- Proper wrenches and spanners: Check for wear and damage
- Lifting equipment: Test cranes, hoists, and pulley systems—92% of safe dismantling procedures mandate trained workers for cranes/hoists on heavy components (United Scaffold Best Practices, 2024)
- Personal protective equipment: Harnesses, hard hats, safety boots, and gloves
- Ground-level barriers: Establish exclusion zones to protect workers below
Senior Scaffolding Inspector at EUTC: Many Scaffolding supervisors skip the tool inspection step, assuming everything’s in working order. However, a worn wrench can slip during critical dismantling moments, causing workers to lose balance or drop components. Always test tools under load before beginning work aloft.
Establish clear communication protocols. Assign specific roles—who removes components, who lowers materials, who monitors ground safety. Set up tag lines for controlled lowering of components, especially in windy conditions common across Saudi Arabia’s construction sites.

Step-by-Step Scaffolding Dismantling Sequence
Unsheeted scaffolds must not free stand more than 4 m above the highest tie remaining in place during dismantling, while sheeted scaffolds must not free stand more than 2 m (SafeWork NSW, 2024). These height limits are non-negotiable and must guide your entire dismantling sequence.
Follow this proven dismantling sequence:
Level 1: Remove Sheeting and Mesh Panels
Start at the top level. Remove any sheeting, tarpaulins, or debris netting first. Keep guardrails in place—guardrails must remain in place for 95% of mesh panel removal during scaffold takedown (SafeWork NSW, 2024). Work systematically around the scaffold perimeter before moving to the next component type.
Level 2: Dismantle Guardrails and Toe Boards
Only remove guardrails after all sheeting is down. Work from the top level downward. Remove mid-rails first, then top rails, finally toe boards. Never remove guardrails from a working level until you’re ready to remove that entire level.
Level 3: Remove Working Platforms and Planks
Platforms must be fully planked for 100% of dismantling steps involving hop-up brackets and tie bars (SafeWork NSW, 2024). Remove planks only after guardrails are gone and you’re ready to dismantle the structural components below. Lower planks using rope and pulley systems—never throw or drop them.
Level 4: Disconnect Horizontal Bracing
Remove horizontal ledgers, transoms, and bracing elements. Work systematically around each level before moving down. Keep the structure stable by maintaining symmetry during removal.
Level 5: Remove Ties and Anchors
This is where those height limits become important. As you remove ties, you must maintain the 4m (unsheeted) or 2m (sheeted) maximum free-standing height above the highest remaining tie. Remove ties progressively as you work down each level.
Level 6: Dismantle Vertical Standards
Finally, remove the vertical posts. Work from the outside inward, maintaining structural integrity until the last components come down. Remove base plates and foundations last.
Throughout this sequence, 80% of scaffolding accidents during dismantling occur due to dropping components instead of lowering them (OSHAcademy Scaffold Procedure, 2025). Use controlled lowering methods for every single component.

Safe Component Handling and Post-Dismantling Procedures
The work doesn’t end when the last standard touches the ground. Proper handling, inspection, and storage of components are essential for future safety and cost efficiency. Many scaffolding companies in Saudi Arabia have reported significant cost savings by implementing thorough post-dismantling procedures.
Component Lowering Techniques:
Never throw materials from height. Use these approved methods:
- Rope and pulley systems: For individual components up to 25kg
- Mechanical hoists: For heavier ledgers and standards
- Crane assistance: For bulk removal on large projects—remember that 92% of safe procedures mandate trained operators (United Scaffold Best Practices, 2024)
- Chutes and designated drop zones: For smaller fittings and hardware
Post-Dismantling Component Inspection:
Inspect every component as it comes down:
- Visual inspection: Check for bends, cracks, corrosion, and damage
- Connection points: Examine coupler threads and locking mechanisms
- Tube condition: Look for dents, splits, or wall thickness reduction
- Planks and boards: Check for splits, excessive wear, or nail protrusions
Tag damaged components immediately. Don’t let them mix with serviceable materials. In Saudi Arabia’s harsh climate, pay special attention to sun damage on planks and corrosion on metal components exposed to coastal humidity.
Proper Storage Procedures:
Sort components by type and condition:
- Store tubes horizontally on racks to prevent bending
- Stack planks flat with spacers for air circulation
- Keep couplers and fittings in covered containers
- Separate damaged items for repair or disposal
- Document inventory for the next project
Senior Scaffolding Inspector at EUTC: Create a simple traffic light system—green tags for good condition, yellow for minor repairs needed, red for immediate retirement. This expedites the next erection process and prevents damaged components from accidentally getting reused.
Complete your HSE documentation. Record dismantling dates, crew members involved, any incidents or near-misses, and component condition reports. This documentation proves compliance during inspections and helps identify training needs.
Frequently Asked Questions
What’s the most important rule when dismantling scaffolding?
Always dismantle from top to bottom in the exact reverse order of erection. This maintains structural integrity throughout the process. Keep ties in place until free-standing height limits are met—4m for unsheeted and 2m for sheeted scaffolds above the highest remaining tie (SafeWork NSW, 2024). Never skip steps to save time.
How many workers are needed for safe scaffold dismantling?
Minimum two workers for standard scaffolds, with at least one being a competent person trained in scaffolding work. Larger or complex structures need additional crew members. When using cranes or hoists for heavy components, 92% of safe procedures mandate specifically trained workers for this equipment (United Scaffold Best Practices, 2024).
Can you dismantle scaffolding in windy conditions?
Stop work when wind speeds exceed safe limits—typically 40 km/h (25 mph) for most scaffolding work. Wind creates additional loading on the structure and makes controlling lowered components difficult. Check local weather forecasts and postpone dismantling if high winds are predicted. Your safety officer should have a wind speed meter on site.
What should you do if you find damaged components during dismantling?
Tag them immediately with red markers or tape. Remove them from the work area so they can’t be accidentally reused. Document the damage in your inspection reports. Some damage can be repaired, but bent tubes, cracked couplers, and severely deteriorated planks must be permanently removed from service.
How do you maintain scaffold stability during progressive dismantling?
Follow the height-to-tie ratios strictly—scaffolds need support if height to base exceeds 3:1 (SLAC Stanford Scaffold Procedure, 2024). Remove ties progressively as you work down, never removing more than necessary at each level. Maintain symmetry by working evenly around the structure rather than completely dismantling one section first.
Conclusion
Safe scaffolding dismantling requires methodical planning, proper sequencing, and unwavering attention to safety protocols. The statistics are clear: following the correct top-to-bottom dismantling sequence reduces fall risks by 65% (GM Scaffolding Blog, 2024), while proper component handling prevents 80% of dismantling accidents (OSHAcademy Scaffold Procedure, 2025).
Whether you’re working on projects in Saudi Arabia or elsewhere, these principles remain constant. Here are your key takeaways:
- Complete thorough pre-inspection: Check tools, equipment, and scaffold condition before starting
- Follow the reverse erection sequence: Top to bottom, maintaining structural integrity at every step
- Respect height limits: 4m for unsheeted, 2m for sheeted scaffolds above the highest remaining tie
- Lower, don’t drop: Use controlled lowering methods for all components
- Inspect as you dismantle: Tag damaged components immediately for repair or disposal
- Document everything: HSE records protect your team and prove compliance
The dismantling phase is when fatigue sets in, and workers want to finish quickly. That’s exactly when accidents happen. Maintain discipline, follow procedures, and never compromise safety for speed. Your crew goes home safe, your components remain serviceable, and your next project starts with reliable equipment.